Article
Flutter Mobile App Developer Guide, Part V: Techniques for Code Optimization

February 13, 2024 ...

So far, we’ve discussed the following topics related to becoming an effective Flutter mobile app developer:
- Navigating the Flutter framework
- Strategies for streamlined workflows
- Additional coding tips and best practices
- Common pitfalls to avoid in your Flutter app development journey
This post focuses on advanced optimization techniques for the Flutter mobile app developer seeking to fine-tune their widget development. We aim to elevate your codebase, ensuring readability, maintainability, and adherence to high coding standards.
Delving into these topics enhances our Flutter coding prowess and shapes the approach to coding, influencing practices for ongoing and upcoming projects.
These insights empower you—a highly effective Flutter mobile app developer in the making—to craft versatile components that seamlessly integrate across your app, eliminating redundancy and promoting efficient code structure.
Proper naming conventions
Adhering to proper naming conventions is crucial for maintaining readability in any code. Despite its apparent simplicity, this fundamental best practice is frequently overlooked.
Though it might require some initial time investment, following coding guidelines and best practices is a time-saving measure in the long run.
- Use snake_case (lowercase with underscores) for libraries, directories, packages, and source files.
- Start private variable names with underscores.
- Use lowerCamelCase for constants, variables, parameters, and named parameters.
- Use UpperCamelCase for classes, types, extension names, and enums.
- Always use clear and meaningful names to improve code readability.
- Following these naming conventions may seem like extra work at first, but it can save time in the long run by making your code easier to read and review.
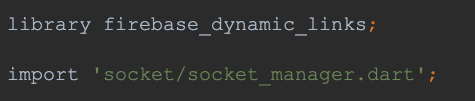
Libraries, packages, directories, and source file names should be in snake_case(lowercase_with_underscores).
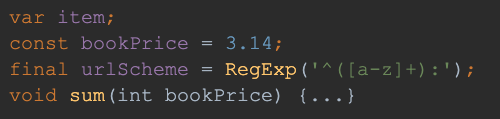
Variables, constants, parameters, and named parameters should be in lowerCamelCase.
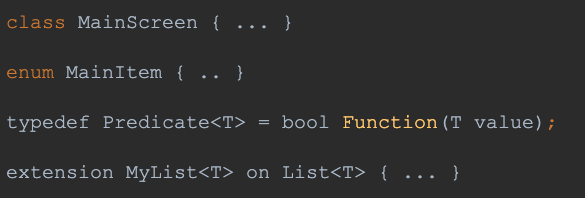
Classes, enums, typedefs, and extension names should be in UpperCamelCase.
Specify types for class members
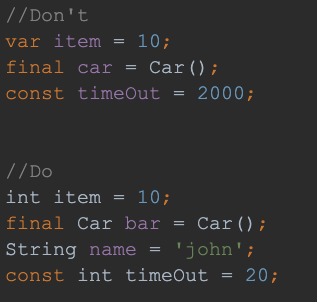
Always specify the type of member when its value type is known. Avoid using var when possible.
Make Flutter layout responsive with Fittedbox widget
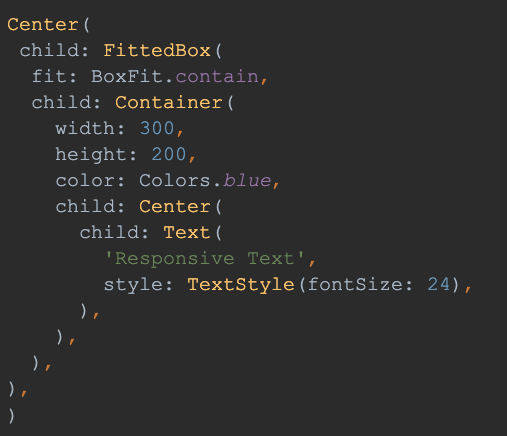
The FittedBox widget in Flutter can be used to make your layout responsive by scaling and positioning its child within its constraints. This can be useful for ensuring that your app’s content scales appropriately on different screen sizes and orientations.
Prefer extracting callbacks
Prefer extracting callbacks is a best practice in Flutter that suggests creating separate callback functions or methods rather than defining complex logic directly within event handlers or callbacks. This practice promotes code modularity, readability, and maintainability.
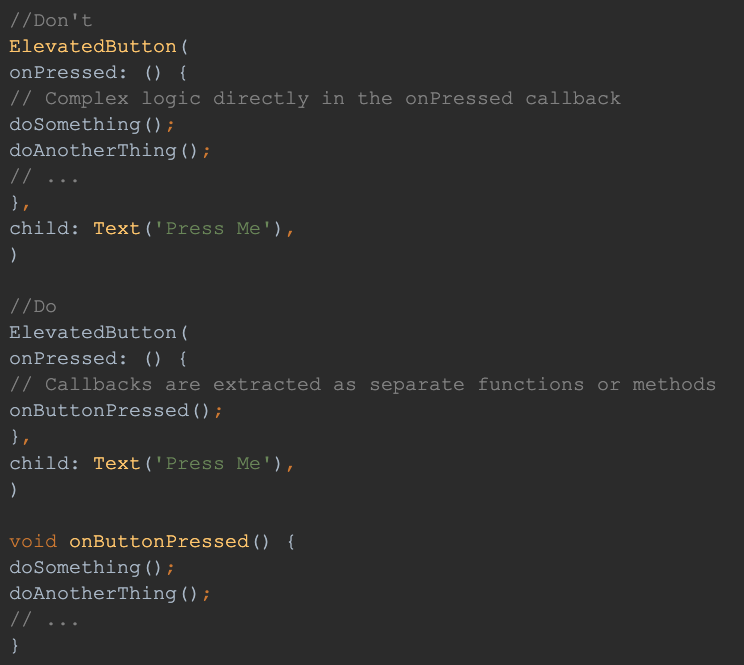
Here’s an illustrative example to grasp this concept—a button designed to execute a specific action upon being pressed.
Split widgets into sub Widgets
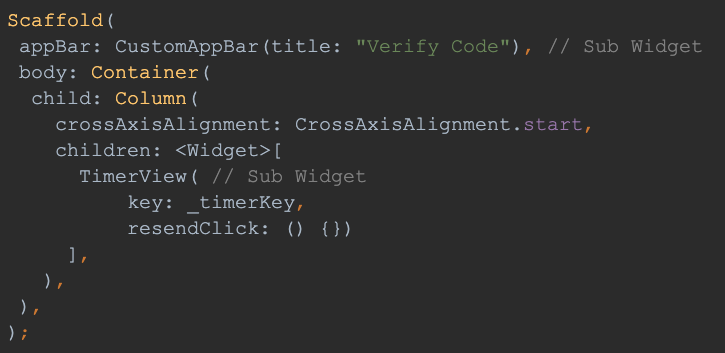
When you invoke setState() on a State, it triggers a rebuild for all descendant widgets. Hence, it’s advisable to decompose the widget into smaller ones. By doing so, you can limit setState() calls to only the portion of the subtree where the UI truly requires modification.
Instead of Containers, Use SizedBoxes

When adding placeholders comes, using SizedBox() instead of Container() is recommended. Since SizedBox is a const constructor, the compiler creates more efficient code.

In addition to serving as placeholders, SizedBox is valuable for defining custom spacing, image dimensions, or other widget sizes when the implementation necessitates only width and/or height adjustments.
Create Build Function pure
Creating a pure build function is essential for optimizing app performance. A pure build function avoids unnecessary operations that can slow down the user interface rebuilding process. A well-designed, pure build function can significantly enhance app performance, while a poorly designed one can lead to frustrating user experiences. Developers should prioritize creating pure build functions to ensure smoother and more efficient app performance.
How to maintain a pure build function:
Avoid triggering/calling unnecessary functions/logic in the build method – this would get triggered every time the build state is called. If widget data needs to be processed at the start of the screen/widget, try calling it in the initState function.
When to Add Logic in the Build Method
In specific scenarios, it’s acceptable to incorporate logic within the build function. This is often the case when handling straightforward UI logic or managing UI state, such as conditionally rendering a widget based on a boolean value or toggling the visibility of widgets based on user interaction.
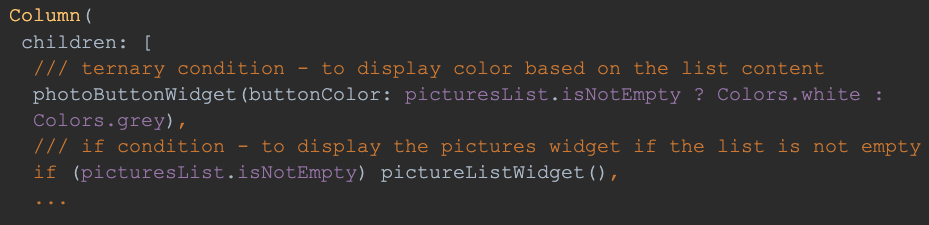
Here are some common strategies for manipulating widgets and properties while loading the UI. You can employ ternary operators and if conditions to dynamically display widgets or adjust properties, like changing the color of a button.
Building List or Grids: Building dynamic lists or grids using ‘ListView.builder’, ‘GridView.builder’, or similar widgets is a common use of logic in the build method.
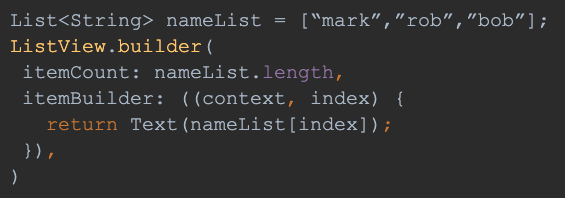
This showcases the utilization of ListView.builder to display names from a list dynamically.
When to Avoid Adding Logic in the Build Method
Things to avoid in the build method:
- Heavy Computation: Avoid performing heavy computations, data processing, or time-consuming operations within the build method. These tasks can make your app unresponsive and slow.
- Fetching Data: Avoid making network requests or database queries directly in the build method. Use asynchronous operations in advance to fetch data and then update the UI when the data is available.
- Infinite Loops: Be cautious not to create infinite loops or side effects within the build method, as this can lead to unexpected behavior and poor performance.
- Complex Business Logic: Complex business logic, calculations, or extensive data transformations should be handled outside the build method, typically in separate classes or methods.
To keep your code maintainability and ensure app responsiveness, decoupling your logic from the build method is advisable. Leveraging state management solutions such as Provider, Riverpod, or Bloc facilitates effective application state management and handling of intricate logic. This approach keeps your UI code uncluttered, concentrating solely on the presentation layer while delegating the business logic and data handling to dedicated modules or classes.
Instead of methods, refactor the code into Widgets
In Flutter app development, embracing code refactoring into widgets is a best practice. This strategy capitalizes on the lifecycle features and optimizations inherent in widgets, resulting in streamlined code, smoother builds, and the prevention of unnecessary rebuilds when a widget remains static. Refactoring promotes builds exclusively upon widget alterations, harnessing Flutter’s widget class optimizations to produce a more concise and effective codebase.
Creating widget classes proves effective in several scenarios, eliminating redundancy, adhering to the DRY (Don’t Repeat Yourself) principle, and simplifying UI creation and editing processes.
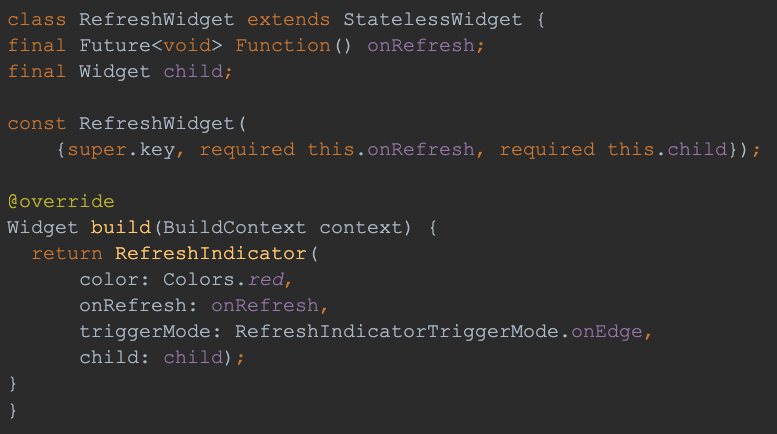
In this example, we are creating a widget class named “RefreshWidget” which returns a RefreshIndicator with a red color. It takes in a Future Function and a Widget.
You can simply add this widget class to any screen by calling and importing RefreshWidget:
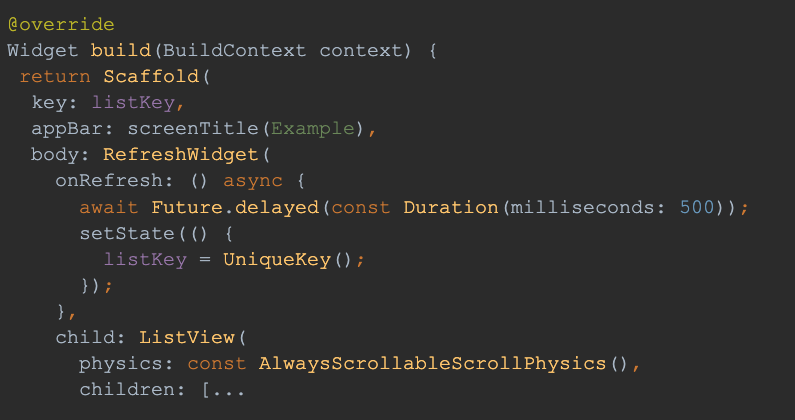
We’ve introduced a timer to simulate an API call to simplify matters. This Future function mimics calling an endpoint. We must wait to refresh the screen’s content. We then invoke setState() and update the scaffold’s key, triggering a UI update after the timer/API call.
It’s important to note that in this example, RefreshIndicator functions only if the content is scrollable. Therefore, we’ve included a ListView with an AlwaysScrollableScrollPhysics, eliminating the requirement for the content to exceed the phone’s height.
In this scenario, “RefreshWidget” proves invaluable for implementing RefreshIndicator across multiple screens, as is often the case. Consider adding “RefreshWidget” to 10 screens and later if the design necessitates a switch from a “red” loader to a “green” one. With this setup, making a single change updates all screens, thereby reducing redundancy, adhering to the DRY principle, maintaining smaller file sizes, and promoting loose coupling.
A range of optimization techniques for the Flutter mobile app developer
We delved into proper naming conventions, type specifications for class members, ensuring responsive layouts with the FittedBox widget, extracting callbacks, breaking down widgets into sub-widgets, prioritizing SizedBox over Container, keeping build functions pure, and refactoring code into widgets rather than methods.
In our upcoming final post of this series, we’ll delve into Flutter testing and security—essential topics that warrant significant attention and priority in the development cycle.