Article
Modernizing WordPress Development with Sage 9 – Part 2

August 2, 2018 ...
In the previous post, we introduced you to Sage 9, our choice when it comes to developing a WordPress theme from scratch.
Sage 9 contains a ton of content and features that can help you modernize your WordPress development process. As we mentioned previously, Sage 9 utilizes the already-popular Blade Template Engine from Laravel. One of the biggest bonuses is that this engine helps you separate the logic from the presentation layer, which results in more readable code in template files.
You might be asking yourself what the difference between a “Theme” and “Template” is. To put it simply, a Template is what an individual page is going to look like. A Theme is a whole bunch of interrelated Templates that can be used to create a cohesive look and feel.
Why Use the Blade Template Engine?
WordPress itself has a built-in template system. But the built-in system has its limitations – it’s just a collection of PHP functions that you put directly inside a template files. This system makes your code harder to read and can also make you have to repeat the same code across many pages.
The concept of Blade is “write everything only once and extend it when needed.” It’s similar to the DRY principle of software development: Don’t Repeat Yourself.
Here’s how it works. With the Blade Template Engine, you can write the main layout that has a bunch of empty sections (think modules). Then, you create another template which “extends” this main layout template. The bonus is that all you need is to fill those empty sections – not the whole template!
Tip #1: Echo & Comments
Blade Template Engine is basically a PHP file with some special Blade directives, which will be translated into normal PHP functions in compiling state (Blade does this automatically). This means you can just write your HTML code directly into Blade template file.
In a case where you want to echo something out (like a variable or gettext for localization), You can simply put text inside double curly braces. This will perform the action automatically.
<p class="text">{{ $variable }}</p>
<p class="text">{{ __('Some text for localization', 'textdomain') }}</p>
Keep in mind that echoing HTML requires a unique approach so that the special HTML characters are not escaped and processed for display. Double curly braces around the text ( {{ ... }} ) will only show the raw text. This means you can’t echo a string that is formatted by HTML this way.

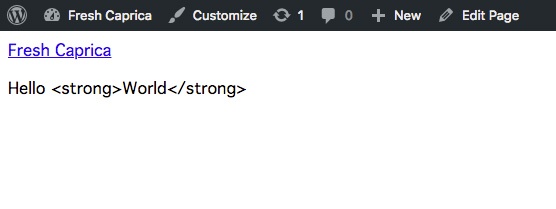
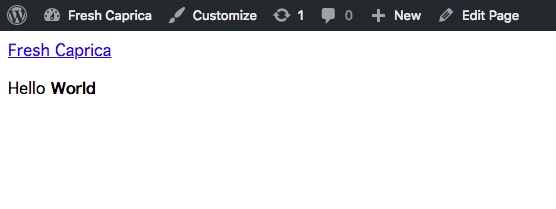
To echo HTML formatted content, use single curly brace with double exclamation marks instead {!! ... !!}
<p class="text">{!! $variable !!}</p>
<p class="text">{!! __('Hello <strong>World</strong>', 'textdomain') !!}</p>

wrapping text with
__()function will make text translatable.
To add comments code in the file, use double curly braces and double minus sign {{-- Comment here --}} as this also supports multi-lines comments.
Tip #2: Template Extending
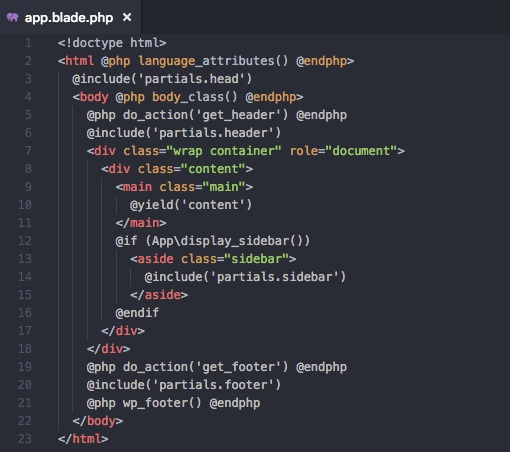
The main layout template for Sage 9 can be found at ./resources/views/layouts/app.blade.php, which is basically just an overall HTML structure for each page. In other template files, for example, ./resources/views/index.blade.php you won’t see most of HTML structure. Instead, you’ll see a directive @extends('layouts.app') which is telling the template engine that this template file is extending from layouts/app.blade.php.
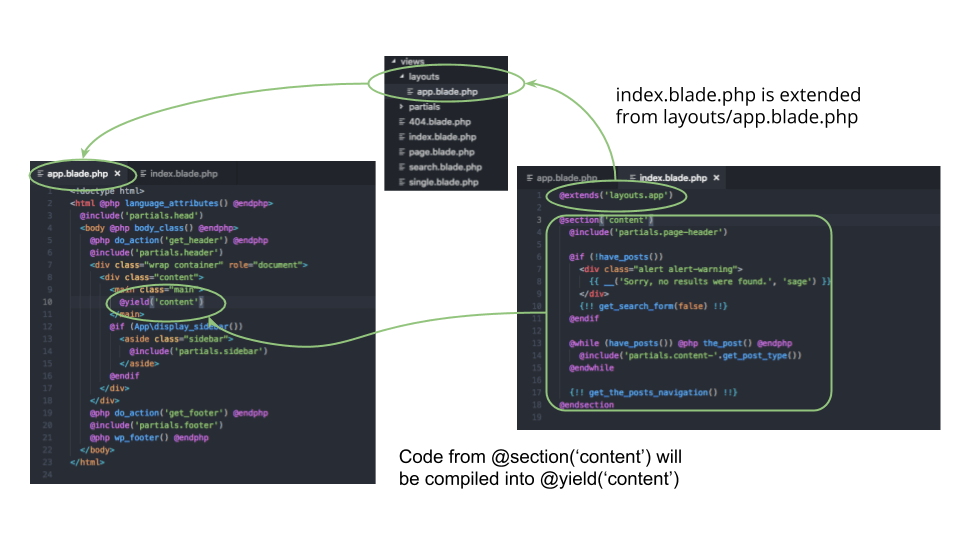
Another important directive is @section('section_name_here') ... @endsection, which tells the template engine that code in this block is to display in the parent template where it makes a @yield('some_section_here) directive in the parent template. For example, note in the code below the directive @yield('content') in the layouts/app.blade.php allows @section('content') from the views/index.blade.php to be imported, and compile the template into a cache directory for later use.
The power in this approach to templating can be seen in the following example. Let’s say you have two archive layouts (archive.blade.php and archive-books.blade.php), which essentially look the same.
What makes these two archives different is the latter has an “intensive search filter.” In this case, you can just write archive.blade.php and @yield a section for the search filter. Then in archive-books.blade.php, you just extend it from archive.blade.php and write the search filter in a section you declared in archive.blade.php.
Bottom line, there’s no need to write the whole template again!
Tip #3: Condition and Loop
The control structures of if ... else, while, for, and foreach in Blade are the same as vanilla PHP, but need the @<control> directive to open the control block and close it with @end<control>.
Take the following, for example:
if ... else
@if( $condition )
  .. stuff ..
@elseif( $another_condition )
  .. stuff ..
@else
  .. stuff ..
@endif
while
@while( $condition )
  .. stuff ..
@endwhile
Tip #4: Include partial templates
With Sage 9, the built-in PHP function get_template_part() is broken. But fear not this night, you will not go astray!
To allow for partial templates to still be used, the Blade Template Engine has the @include directive, which includes other partial template files with the path being related to the ./resources/views directory. You can use . instead of / – there’s no need to include a file extension.
If you want to include a template stored in ./resources/views/partials/footer.blade.php, you can include this template file using @include('partials.footer')
Subpoint #4.1: How do I pass variables to the partial template?
The @include directive also lets you pass variables to including template files by passing an array as a second argument. Each array key will be translated into an individual variable with the same name, with the corresponding value.
For Example:
index.blade.php
@include('partials.footer', [
  'color' => 'green',
  'show_menu' => true
])
partials/footer.blade.php
<div class="footer footer--{{ $color }}">
@if( $show_menu )
<ul class="footer__menu">
..
</ul>
@endif
<p class="footer__copyright">
© 2018 Fresh Consulting
</p>
</div>
Subpoint #4.2: What if I want to include a Blade Template file outside another template file?
In some circumstances – such as when you are writing a widget for your Sage 9 theme – you’ll want to use the Blade Template for displaying the widget. This is actually possible!
Sage 9 provided a PHP function to call the Blade Template file in vanilla PHP file called Apptemplate( $template_name [, $passing_variables] )
$template_nameis a path to the template file related to./resources/viewsdirectory. If your template file located at./resources/views/widgets/author-list.blade.phpthen$template_namewill be'widgets.author-list'$passing_variablesacts the same way as the@includedirective. Each array item will be extracted to its own variable with the same name.
In fact, the @include directive is actually a wrapper around this function.
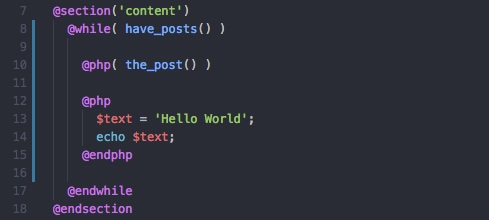
Tip #5: Vanilla PHP Code
You might want to just use vanilla PHP code (for example: calling the WordPress Template Tag). Fortunately, Blade also lets you do that too.
There are 2 ways to execute vanilla PHP Code inside a Blade Template File.
- For Single line PHP Code, use
@php( function_name() ) - For Multi-lines PHP Code, wrap your php code with
@php ... code ... @endphp
Bonus Tip: If you are using VSCode…
VSCode is awesome! And we love it!
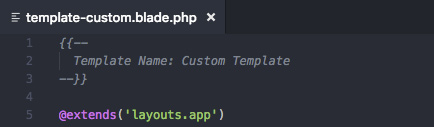
By default, VSCode does not support Syntax Highlighting for the Blade directive; instead, VSCode will treat it as a PHP file and all Blade directives won’t get highlighted at all. As an example, if you open file .blade.php in VSCode, it might show up with weird highlighting like this:
To solve this, let me introduce you to this laravel-blade extension for VSCode!
This extension adds Blade syntax highlighting support to VSCode. With this extension enabled, all .blade.php files should be highlighted properly. You might be noticing that emmet is broken. Because this extension register took over file .blade.php as a new file type, VScode won’t treat it as .php anymore.
Fortunately, VSCode let you override the emmet setting on each file type. So we just need to tell VSCode to treat .blade.php as an HTML file. To do this, go to:
- Mac:
Code > Preferences > Settings - Windows:
Files > Preferences > Settings
Then add a setting for emmet.includeLanguages (to do this, you can search setting from left panel then click Pencil icon > Copy to Settings) and add value "blade": "html" into this setting.
"emmet.includeLanguages": {
  "blade": "html"
},
Save settings and emmet should now work properly on the Blade file!
While we can force emmet to treat the Blade file as PHP, we won’t! The point of using a template engine is to separate Logic and Presentation into Controllers and Views, accordingly. That means our template files will contain only Presentation, not the Logic itself.
…to be continued in Part 3
It’s about time to get to know the Controller!
Currently, when a part in the template file really needs coding logic to make it work (such as pulling taxonomy and throwing them in a select element), we normally just put our logic code in our PHP template file. It usually works just fine. But when we introduce more code, our file becomes more unreadable.
With the Controller, we will put all the logic in separated files and expose processed data back to template files.
We’ll dive deeper into this in Part 3.