Article
Building a Data Import Tool with Azure WebJobs

June 10, 2014 ...

Recently we built a new site for a client and hosted it on Microsoft Azure. I’ve been very happy with the ease of deployment and scalability that Azure provides. One critial piece to this new application was creating an automated tool that would import data from their primary mainframe system into our new web application. Normally I would build a simple command line tool and install a windows service to handle such a task. However, I didn’t want the overhead and upkeep of running a server in the cloud. Fortunately, thanks to a new Azure feature called Azure WebJobs, I was able to easily create a solution to handle this requirement.
Overview
Azure WebJobs provides exactly what you would need in the scenario I described above.
The Windows Azure WebJobs SDK is a framework that simplifies the task of adding background processing to Windows Azure Web Sites.
Simply put, you create a simple console based app, zip and publish it, then schedule how frequently you want it to run. You can also have it continuously running, which is helpful if you are monitoring a folder or waiting for an event to occur (as in our case). As an added bonus, the WebJobs SDK provides a set of data annotations which serve as hooks into other Azure services, such as container storage. Previously you had to do a bit of grunt work to setup listeners for these resouces, now they are one line entries, including output.
Code
After installing the Azure WebJobs SDK in your project (see this link/a> on how to get started), you can create a new console application and get started. The core of my import program looks like this:
using System;
using System.Configuration;
using System.IO;
using Microsoft.WindowsAzure.Jobs;

namespace dataimportwebjob
{
  partial class Program
    {
        public static JobHost Host;

        static void Main()
        {
            var path = ConfigurationManager.AppSettings["DirectoryBaseToWatch"];
            var folder = ConfigurationManager.AppSettings["DirectoryFolderToWatch"];
            var directories = Directory.GetDirectories(path, folder);
            var fsw = new FileSystemWatcher[directories.Length];

            Console.WriteLine("Setting up monitoring for path: " + path + folder);

            for (var i = 0; i < directories.Length; i++)
            {
                fsw[i] = new FileSystemWatcher(directories[i])
                    {
                        NotifyFilter =
                            NotifyFilters.LastAccess | NotifyFilters.LastWrite | NotifyFilters.FileName | NotifyFilters.DirectoryName |
                            NotifyFilters.Size
                    };

                fsw[i].Created += fsw_Created;
                fsw[i].IncludeSubdirectories = true;
                fsw[i].EnableRaisingEvents = true;
            }

            Host = new JobHost();
            Host.RunAndBlock();
        }

        static void fsw_Created(object sender, FileSystemEventArgs e)
        {
            Console.WriteLine("File Detected: " + e.FullPath);
            var deleteAfterUpload = bool.Parse(ConfigurationManager.AppSettings["DeleteAfterUpload"]);

            while (!IsFileReady(e.FullPath))
                System.Threading.Thread.Sleep(1000);

            UploadFileToBlob(e.Name, e.FullPath, deleteAfterUpload);
        }

        public static void ProcessImportFile([BlobInput("importjobsdata/{name}")] TextReader input,
                            string name,
                            [BlobOutput("importjobslog/log_{name}")] TextWriter writer)
        {
            writer.WriteLine("Starting import file process...");

            var result = InputData(input, writer);

            var status = result == 0 ? "SUCCESS" : "FAIL";
            var message = result == 0
                      ? "Import success."
                      : "Import fail. " + result + " records failed to import. Check logs for details.";

            writer.WriteLine(message);

            // Write entry to ImportEntry table for use by web application.
            using (var db = new TrackingModels.TrackingContext())
            {
                var entry = new TrackingModels.ImportEntry
                    {
                        Status = status,
                        FileName = name,
                        Message = message,
                        CreatedAt = DateTime.Now
                    };

                db.ImportEntries.Add(entry);
                db.SaveChanges();
            }

            writer.WriteLine("Import file process complete.");
        }

        public static void UploadFileToBlob(string name, string path, bool deleteAfterUpload)
        {
            var method = typeof(Program).GetMethod("Upload");
            Host.Call(method, new { name = name,
                    path = path,
                    deleteAfterUpload = deleteAfterUpload
                });
        }

        public static void Upload(string name, string path, // Local file
                        [BlobOutput("importjobsdata/{name}")] Stream output,
                        bool deleteAfterUpload)
        {
            using (var fileStream = File.OpenRead(path))
            {
                fileStream.CopyTo(output);
            }

            if (deleteAfterUpload)
            {
                File.Delete(path);
            }
        }

        public static bool IsFileReady(String sFilename)
        {
            try
            {
                using (var fileStream = File.Open(sFilename, FileMode.Open, FileAccess.Read, FileShare.None))
                {
                    if (fileStream.Length > 0)
                        return true;
                    else
                        return false;
                }
            }
            catch (Exception)
            {
                return false;
            }
        }
    }
}
Let’s break this code down into its core components:
File System Watcher (line 23) – Here we setup a file system watcher to check a specific location(s) for a file to be uploaded. This file system watcher is checking a directory on our website (more on this in a minute).
Upload Method (line 92) – This is an example of a data annotation. We read the file specified into a stream and simply copy it to our output stream, which is hooked up to our Azure storage blob. It couldn’t be simpler!
Process Import File (line 50) – Here is another data annotation that serves as a listener in our Azure container. By setting up an input and output parameter with a machine name parameter, Azure will check for new files in our input location that don’t have a matching file in our output location (preventing duplicate processing of the same file if the process restarts itself). When this occurs it calls the method in question. We pass our output TextWriter (for logging) into our ImportData method that does all the heavy lifting of parsing the data into the database. Once a new file is detected in the blob the process fires off again, allowing us to process multiple files simultaneously if needed. That’s all there is to it! No complex configurations necessary.
Installing Your WebJob
When you’re ready to install and run your WebJob, compile your application and zip up the output binary folder (bin/Debug or bin/Release depending on your configuration). Log in to your Azure Control panel, select your Website, and select the “WebJobs” tab. Click the “Add” button at the bottom of the page and enter the details specified.
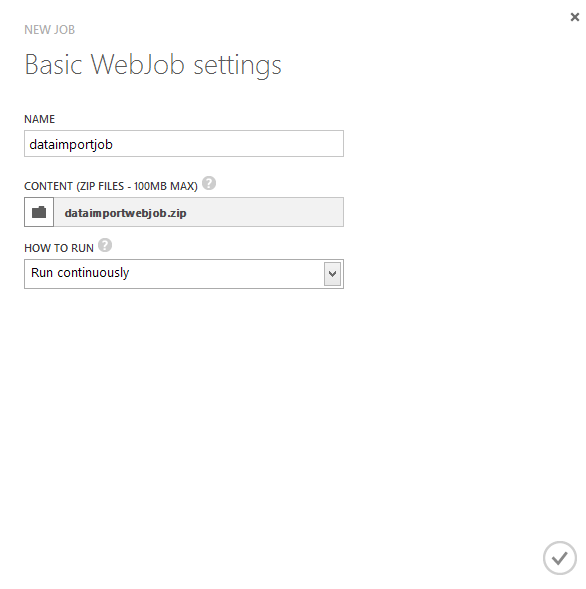
Click the check box and shortly your job will be up and running! There will also be a link so you can see the output from the WebJob itself.
Checking Output
What happens when you want to track the result of an import? You can always log in to the Azure control panel, navigate to your containers and view files that way, but that can be cumbersome at times. Since I’m outputting my import process into a simple text file, I can build an import viewer into my web application that reads the content of a blob item in a few lines of code:
var storageConnection = CloudConfigurationManager.GetSetting("StorageConnectionString");
var containerName = CloudConfigurationManager.GetSetting("StorageContainerName");
var storageAccount = CloudStorageAccount.Parse(storageConnection);

var blobClient = storageAccount.CreateCloudBlobClient();
var container = blobClient.GetContainerReference(containerName);
var blobLog = container.GetBlockBlobReference(id);

string logText;

using (var memoryStream = new MemoryStream())
{
    blobLog.DownloadToStream(memoryStream);
    logText = System.Text.Encoding.UTF8.GetString(memoryStream.ToArray());
}
That’s all you need to do! You can pass the log text to your view, or wherever you need it to view its contents. What you choose to log is up to you. For me, I did a line-by-line record of a unique identifier, a success/fail message, and the basic contents of the exception of the record failed to import. That way I had most of the pieces I needed to debug the issue. If that wasn’t enough I have access to the import file itself and can look further.
Why a File System Watcher?
You may have noticed that there seems to be an “extra step” to this import tool. Why have a file system watcher on a folder in the website when I could upload directly to the container and let the WebJob immediately process the file? There were a few mitigating factors in this:
Technology Support – In order to upload to the blob container directly, I would have needed to create some kind of tool on the mainframe computer and would need the .Net libraries to do so, which wasn’t available.
Security / Complexity – By default, Azure containers are not publically accessible. You need to set up additional authorization to access the content in the container, which some apps (like CloudBerry Explorer) already use. Our mainframe source server couldn’t leverage these tools. In addition, there are some WorkerRoles you can install via Azure that create an FTP server for your storage container, but it added “yet another service” to the system and I didn’t want too many parts in place to provide points of failure for this system. Since Azure websites allow you to provide standard FTP access, I found the easiest, and simplest, solution was to set up a special folder in our website for import uploads, create a file system watcher for that location, and simply copy the files to storage container. If the website is recycled for any particular reason, all of our import files are already in the storage container for historical tracking. Similarly, if the webjob needs to recycle itself for any particular reason, any new files in the import folder will immediately be grabbed upon restart.
Conclusion
Azure WebJobs has made a potentially difficult and complex feature an easy and simple one to implement. It’s stable, scalable, and easy to modify as our needs change. If you haven’t checked out Azure WebJobs yet, you should, it can be used for a wide variety of needs.