Article
WordPress Plugin Highlight: Advanced Custom Fields (ACF)

February 9, 2017 ...

Our clients often come to us in need of a custom hero (a section of a website, traditionally placed at the top of the page, that contains key content) with the flexibility to easily switch out content.
Now, you are probably thinking, can’t the WordPress WYSIWYG editor do that? Or, better yet, what about a shortcode? Yes, both of those solutions can accomplish this; but, both also tend to be error prone, especially when introducing HTML markup.
Thankfully, the Advanced Custom Fields (ACF) plugin makes this task far more manageable for our clients. I discovered the ACF plugin early in my WordPress career and haven’t found another custom fields plugin that comes close in terms of modularity and ability to integrate with many other plugins. I recommend using it for every WordPress install you develop.
What is ACF (Advanced Custom Fields)?
Advanced Custom Fields is a WordPress plugin that acts as a Graphical User Interface (GUI) layer for custom fields. Custom fields are native to WP and appear on pages, posts and custom post types, however the native interface is not particularly user-friendly. ACF allows you to extend WP and develop dynamic custom fields for your templates and custom post types.
Free vs. Pro
The ACF plugin has two different versions, a free version and a paid version (Pro). The free version is available for download on the WordPress plugin repository. It comes with everything you need to get started adding custom fields to your WordPress site. Out of the box you get over 20 different field types to choose from. Some of the most notable ones include:
- Text
- WYSIWYG Editor
- Image
- Google Map
- Color Picker
The free version helps solve many problems of adding custom fields into WordPress, but misses two key features that the Pro version solves: Repeater Fields and Flexible Content fields. These two features allow you to build a complex, intuitive experience for your WordPress back-end.
Fresh holds the rights to ACF developer licenses, which benefits our clients because the ACF Pro plugin is installed on every WordPress site we manage, free of charge.
Basic Setup
Our client Tempered Networks came to us wanting a custom, editable hero on their About Us page (Figure 1). Using ACF, we were able to predefine fields that would allow the client the flexibility to switch out content without using a WYSIWYG editor. Here’s how.

Figure 1
To start, once the plugin is installed, navigate to the new Custom Fields item in the WordPress menu. From here, click Add New (Figure 2).
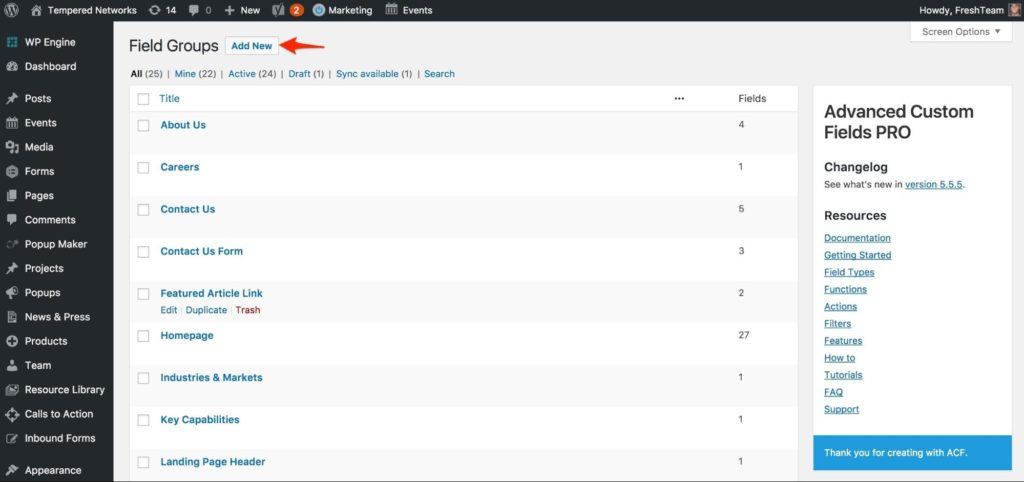
Figure 2
Below (Figure 3), leverage ACF to define each individual field and select a type for the About Us hero. In this particular example, we used an Image, Text, and URL field; but, as I said earlier, there are over 20 different field types you can use when creating with Advanced Custom Fields.
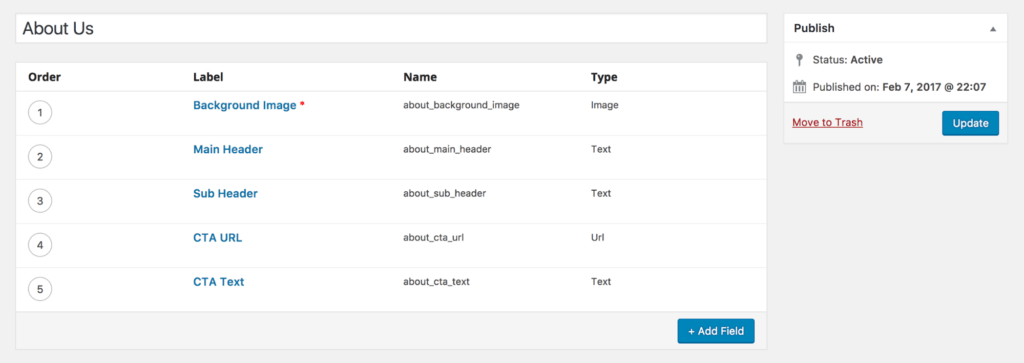
Figure 3
With the fields defined, you now need to specify where these fields will live within WordPress. For the Tempered Networks case, we wanted the hero fields to be only on the About Us page, so we set up a rule to define the location as the About Page. After saving, ACF will read the specified location and place the fields only on that page/those pages (Figure 4). In this particular situation, we are pointing to a specific page, but there are many other useful location options you can target such as post types, page templates, and more.
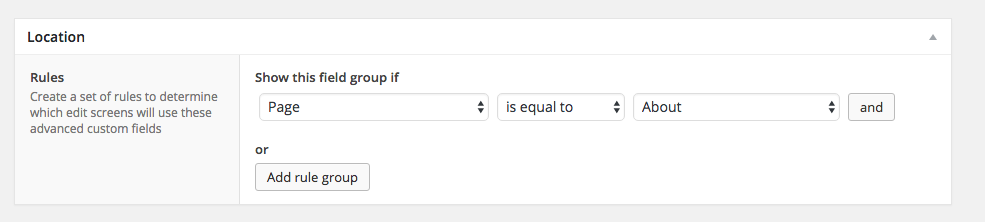
Figure 4
The next step before hopping into the code is to supply data for these newly created fields. Since we defined our ACF fields as equal to the About page, when navigating to edit the About page in the WordPress back-end, we see these available fields (Figure 5).
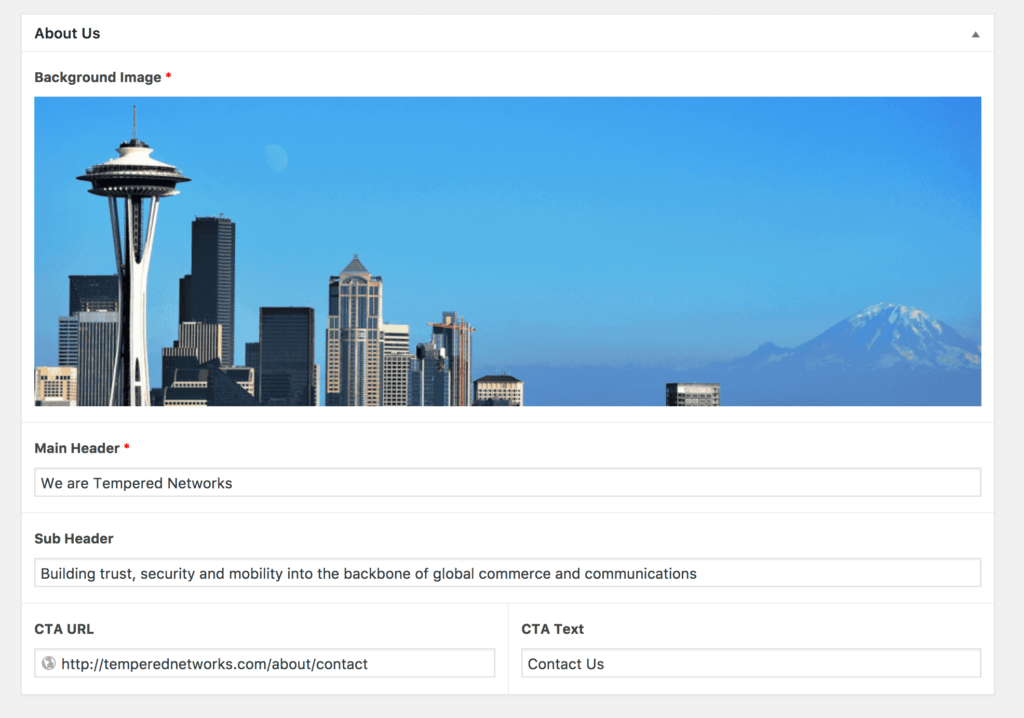
Figure 5
Adding Code
Once the fields are created, a location has been specified, and data is filled out, you can finally move into code.
Using the ACF functions get_field($field_name, $post_id, $format_value) and the_field($field_name, $post_id, $format_value), specify in your code which field you want to call by looking back at Figure 2 under the “Name” row. So, if you want to call the Background Image, use get_field(), which will provide all the data related to that input field. For an image input, you will receive an array that includes all the available sizes in WordPress of the uploaded image. Below, store the large image URL as a variable that you then echo in your markup.
[code]
<?php
    $about_background_image = get_field( 'about_background_image' )['sizes']['large'];
?>
<section class="hero" style="background-image: url('<?php echo $about_background_image; ?>')">
    ...
</section>
[/code]
For the Main Header, use the_field() which echoes your defined field:
[code]
<h1><?php the_field('about_main_header'); ?></h1>
[/code]
This works for this particular field because the Main Header has been specified as a required field and will always need to be filled out. The Sub Header, on the other hand, is an optional field; therefore, you need to account for it not being filled in. To do this, use the get_field() function to create a conditional and check if it exists:
[code]
<?php if( get_field( 'about_sub_header' ) ): ?>
    <h3><?php the_field( 'about_sub_header' ); ?></h3>
<?php endif; ?>
[/code]
With the main and subheader in place, it’s time to tackle the button.
[code]
<?php if( get_field( 'about_cta_url' ) && get_field( 'about_cta_text' ) ): ?>
    <a href="<?php the_field( 'about_cta_url' ); ?>" class="btn btn-primary"><?php the_field( 'about_cta_text' ); ?></a>
<?php endif; ?>
[/code]
Now, let’s take a look at everything combined to see the final results. Notice that we have additional markup in our example that handles some formatting of the hero section. This will differ depending upon what your particular layout design calls for.
[code]
<?php
    $about_background_image = get_field( 'about_background_image' )['sizes']['large'];
?>
<section class="hero" style="background-image: url('<?php echo $about_background_image; ?>')">
    <div class="container">
        <h1><?php the_field('about_main_header'); ?></h1>
        <?php if( get_field( 'about_sub_header' ) ): ?>
            <h3><?php the_field( 'about_sub_header' ); ?></h3>
        <?php endif; ?>
        <?php if( get_field( 'about_cta_url' ) && get_field( 'about_cta_text' ) ): ?>
            <a href="<?php the_field( 'about_cta_url' ); ?>" class="btn btn-primary"><?php the_field( 'about_cta_text' ); ?></a>
        <?php endif; ?>
    </div>
</section>
[/code]
Now, you have a flexible hero that can easily be edited as needed.
Conclusion
This is a pretty basic example of how the ACF plugin can be used. As you dive deeper into ACF, you will find intuitive features such as repeater fields and flexible content fields which allow for endless possibilities in customizing the way your clients input data on their sites.
Are you using ACF? Let us know your favorite aspect of the plugin in the comments.