Article
Get More Life Out of Your Computer With An SSD Upgrade
It’s amazing how hardware gets “outdated” so fast. I’m running a 2-year old MacBook Pro and while I have 8GB of RAM, I’ve been seeing some dwindling performance on the machine, even after purging cache files and lot of common tricks. I also do a lot of heavy Virtual Machine work for the windows environment (thanks to VMWare Fusion) and it is heavy on disk IO to function. This is critical to my work. After talking with an old friend who is a VM expert, he recommended I upgrade to a SSD to eliminate a lot of VM bottlenecks, and improve the overall performance of my system. After a little research, the process was a lot quicker, easier, and safer (I didn’t want to leave myself without a machine to work on for an entire week) than I thought it would be. I’ll share with you how you can do it too.
The Hardware
For our hardware, we need three items to do the job.
1. Kingston 8GB USB Flash Drive – Used to create a bootable Mountain Lion disk for safety/backup purposes.
2. Sabrent USB 3.0 SATA Drive Case – This helps format our SSD drive and gives us the benefit of being able to use the original hard drive as a Time Machine backup or network storage device, or anything else.
3. Samsung 840 Pro SSD (512 GB) – This is our meat and potatoes. After a bit of digging I found this very helpful article that confirmed what other places were saying. The Samsung drive is reliable with great performance. I went ahead and upgraded to the pro series because my virtual machines do a lot of disk activity and wanted the added performance that the pro series provides. For most needs you can save some money and go with the standard series.
Step 1: Precautions
While we shouldn’t have any difficulties with the upgrade, we want to be prepared in case something odd happens. If you don’t have one already, it is highly recommended that you create a bootable USB disk for OSX. I am running Mountain Lion via upgrade, so I simply logged into the App Store, went to the Mountain Lion section, and re-downloaded the install image. After this, I used a tool called Lion DiskMaker which finishing things off quick and easy. Having a separate USB boot disk with the disk utilities gives us a way to diagnose issues if they come up on either drive, plus it is handy to have if you ever want to reformat.
Step 2: Formatting the SSD Drive
Now that we have our precautions in place, let’s format the drive. Since we have a drive case, and cloning tools at our disposal, we’re going to take this route instead of doing a fresh install of Mountain Lion, or even a restore from Time Machine. All of these are potential options, but cloning is the quickest. Mount the SSD drive inside the Sabrent case, plug both USB cables into your computer, and then flip the on switch. In a moment a box should show up saying that the drive cannot be recognized, and provide an option to initialize the disk. Click this button, which will launch Disk Utility. From there, select the “Erase” option and make sure that the new format is the Mac OSX Journaled format with a GUID partition. Click the erase button and you’ll have a fresh drive in a a minute. I named my drive “Macintosh SSD” but you can name it anything.
Step 3: Clone the HD to the SDD
As mentioned above, we’re going to simply clone our HD onto our SDD. This is the quickest route to take, and I don’t have to worry about reinstalling and reconfiguring my environment (I’ll save that for another day). To clone the drive, we’ll use a program called Carbon Copy Cloner. This is another tool that is quick and easy to use. Once you’ve downloaded CCC and moved it to your applications folder, close up any other running programs and launch CCC. After bypassing the introduction screens, you’ll be presented with a simple two column format. The left is your existing HD (with all items selected) the other is empty for your destination. Use the drop down list to select your SDD. At this point I also setup my screen saver not to go on (which all prevents sleep mode. I did this through the “Hot Corners” option on my desktop/screen saver system settings), and then clicked the “Clone” button.
At this point you’ll be prompted to create a Recovery HD partition on your SSD drive. Make sure to say Yes so that the drive is created. The Recovery HD drive exists on your current Macintosh HD (though hidden) and allows you the option of booting into recovery mode if needed for disk repair. We want to mimic this option with our new setup. After the Recovery HD is created, CCC will jump into the cloning phase. This will take quite a while depending on your hard drive size. I had 415 GB worth to clone (lots of virtual machines, project code, and cloud shared project files), so I let this run overnight. Once this is done you’ll see a nice confirmation message that things are cloned.
Step 4: Testing the SSD
Before we open up the MacBook Pro and potentially leave ourselves without a computer, we need to test the SSD so that we can actually boot from it. Fortunately this is easily accomplished. While rebooting your system, hold down the “Option” key. This will bring up a screen that allows you the option to choose which device to boot from. Select your SSD. If everything loads according to your expectations, then congratulations, you have a new SSD drive for your computer. Go ahead and shut down the system and pull the power plug. It’s time to install the SSD inside the laptop.
Step 5: Installing the SSD
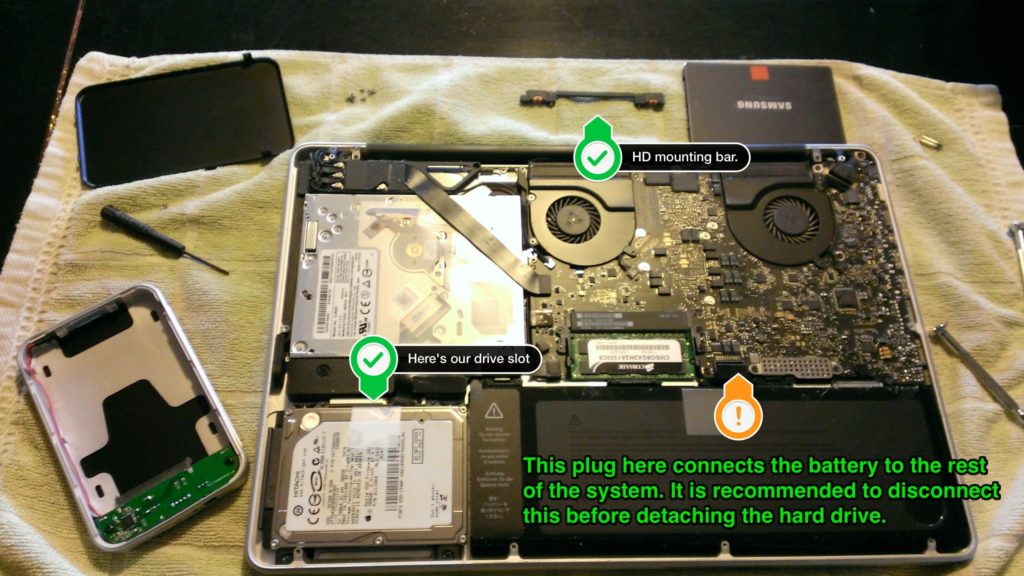
Unlike automobiles of today and laptops of yesterday, where the hardware is very convoluted and difficult to move around, the MacBook Pro has a very open and easy layout in which to access your HD. Simply unscrew the lid off the back of your case and you’ll see the following setup (or close, mine is a 2011 MBP):
The first thing to do is disconnect the battery from the system (see the orange arrow above). I’m not sure this is necessary, but I do this as a precaution. After that unscrew the HD mounting bar on the top side of the HD (as indicated by the green arrow above). There is no need to unscrew the bottom one. After unscrewing the top bar, you should be able to gently pull on the “tape tab” of the hard drive to lift it out. Unplug the SATA cable. You’ll notice on the drive that there are little pegs screwed into the drive. You’ll need to unscrew those from the existing hard drive and put them on yours, like this:
I even went so far as to transfer the “tape tab” to my new SSD, but it isn’t necessary. Once the rods are screwed on, gently attach the SATA cable to the drive. slide it into the HD dock (bottom rods go in first), screw the mounting bar on top, plug in the power, and screw on the case. Plug in the computer and power it on. Congratulations! You’re now in the blazing fast world of SSD! My boot time went down to about 10 seconds from a good 30 to 40. My virtual machines are booting up in about 5 seconds now. It is that amazing.
Final Cleanup and Notes
Once you verify everything is running smoothly you’ll want to download and install the Chameleon SSD Optimizer app. This is a free app that enables a valuable feature on modern SSD drives that isn’t available through OSX itself. According to the website enabling TRIM will increase the write speed and lifetime of the drive. Simply download, install, run, change the switch to “On” and reboot. It also includes other tools to help optimize SSD usage.
You may be concerned about file encryption during this whole process. I run FileVault on my system to help protect my clients documents that may have been sent to me. Fortunately, you won’t have any complications during the formatting and cloning process. The first time I booted the SSD drive (to test its functionality), I was prompted for my “drive key” used to encrypt the drive. After I entered this (also selecting to remember on the keychain) my system was up and running without hassle.
Some people have reported a hotter running machine and/or less battery life after their SSD upgrade. Doing some digging finds that sometimes OSX simply needs to rebuild its index, and after a day things are back to normal. Other reports say that FileVault doesn’t play well in conjunction with TRIM. Disabling TRIM and rebooting the machine resolves the issue. Some others report that resetting your SMC and/or PRAM can help ameliorate issues, though those should be considered more of a last resort.
Please not that all of this is done against a Mountain Lion install of OSX. I don’t know for sure if all of these steps/features will work in Lion, but most of the documentation I went through was older Lion documentation, so I suspect everything will be the same for you.
There you have it. Not counting the clone time, this entire process took me about an hour to accomplish. It’s definitely something you can do after hours one night and it’ll breathe new life into your aging laptop!


