Article
Creating Custom Formatted Sitefinity Widgets

February 17, 2016 ...

I’m moving fast and furious through the Telerik Sitefinity CMS platform as of late. One thing we’re looking to do is to provide “formatted layout widgets” that will allow our end users to add more complex elements to their pages that are formatted nicely. The resources are there in Sitefinity, there are just a couple of pieces not immediately known that you need to make these Sitefinity widgets work.
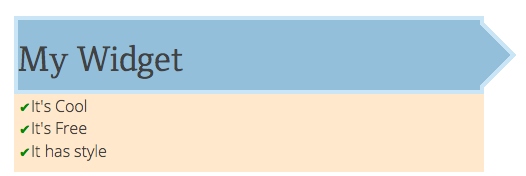
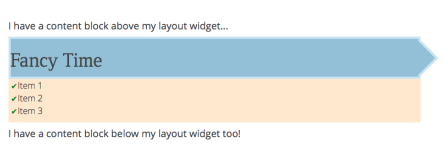
Here is a little more detail of the situation. Let’s say you’re building a site that will have a lot of content pages. To add a little bit of uniformity to the pages, you want to have a consistent header with a list of items attached below it. We’ll put a nice background on it so that it sticks out from the rest of the content on the page. It would look something like this:
Component Breakdown of Sitefinity Widgets
For this widget, I essentially have three main components:
- A div wrapper around everything for a background
- An H1 tag for the header
- An unordered list for my items
I COULD repeat this process on every single page, but that would start to get a little hectic and monotonous. In addition, what if I wanted the background color to be different? Having to update all the pages would be a huge hassle. Instead, what we are going to do is to extend (so to speak) the custom layout widget that is provided in Sitefinity to include some additional styling and content elements within it. I won’t go into step by step details on how to create the custom layout, but you can follow the guidelines found here. The trick to generating the formatted custom layout widget is to know (which took some digging) that Sitefinity keys off of the sf_colsIn and sf_colsOut classes to generate the placeholder elements in the editor for you to add your content in. With that in mind, the control you see above is actually rather simple:
Notice how we create a div wrapper around our H1 tag using the “sf_colsOut” class. We also use the “data-placeholder-label” attribute to display a friendly prompt in the editor. We then add the “sf_colsIn” class to the H1 element itself, which is where our content will go. We repeat this for the content div block. We leave this section option so that the user could add other content, and not just an unordered list. Finally, we add our “fancy-layout” class to the div block surrounding it all. The CSS for this looks like this:
Implementing the Layout
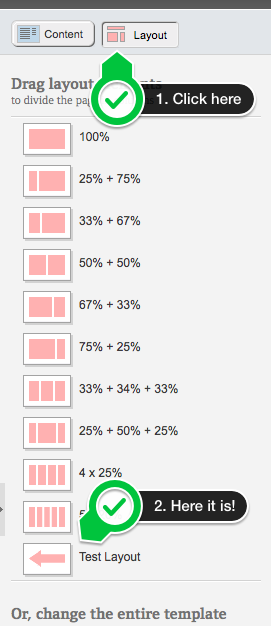
Once you’ve registered the custom layout with your Sitefinity instance (directions found here), you can create a new page, and then click on the “Layouts” button near the top right of the editor. Your layout should show up in the list:
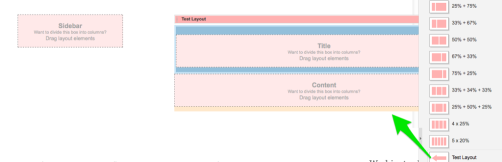
Drag this layout into your main content area (or elsewhere) and you’ll see the placeholders generated for it:
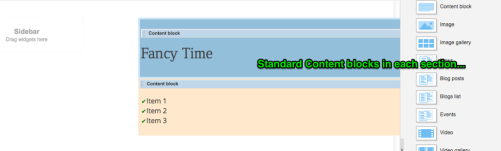
Finally, go back to the Content view and you can drag/drop content blocks into the necessary areas:
You can see how the styling is applied. Publish your page and view the final results. The nice thing is that the layout widget is independent of anything else in the area in which you place it. You can add more content above and below it as needed:
Final Notes
There you have it! By working with the special sf_colsOut an sf_colsIn classes, you can go beyond basic layout controls to apply special formatting and create reusable “formatted layout widgets” to use within your Sitefinity pages.
A couple of important follow-up notes based on this code.
While I’m not 100% sure why, it is important to add the “customClass” with the “sf_cols” class definition, in addition to the “CustomClass” with the “sf_colsOut” class definitions. When I began to work on complex custom layouts, there were text areas that would display just fine in edit and preview mode, but would disappear when the page was rendered. A lot of trial an error revealed that these needed to be there. It could be due to some coding that renders the “droppable areas” used in the site.
Similarly, I’ve put all of my custom classes after the Sitefinity class definitions. I think this may work in any order, but I’ve had the most success when they were put at the end.